How to Change Your Website's Current Hugo Theme to the Theme You Like
This article was updated on 24 June 2023.
Content Links
Introduction
Decide on a Hugo theme
Go to Hugo Themes
Decide how you want to install your selected theme
Download the theme
Extract the ZIP folder
Completely re-create your website’s root folder
Configure your new theme
Test your new theme
Conclusion
Helpful Links
Introduction
In my last article How to Update to the Latest Version of Hugo, I had said I wanted a brand-new clean, simple minimal theme. I wanted a new website theme that would not distract me from focusing on writing quality content.
My website’s earlier theme, which was the Coder Theme, is one of the many excellent themes that caught my eye and featured on the Hugo website’s themes page.
I’m not affiliated with Hugo or the developer(s) of any of the Hugo themes.
I liked the Coder Theme because, at the time, Coder suited my preferences: simple and clean and with multilingual capability.
I liked that the developer built the Coder Theme with multilingual capabilities, allowing me to publish my Spanish-translated articles on my site.
I’m not fluent in Castilian Spanish, and I know words like gracias, estoy bien, and cómo estás and love the pronunciation of Castilian Spanish words.
At the time, translating my articles into European Spanish was a great idea so more people could read my content.
But I gave myself extra work with the Google translation process. Instead of focusing on planning, researching, and writing my next draft, I used my time to translate my published articles.
And I noticed that I was tinkering with my website too much instead of writing.
So I needed to change the Coder theme.
What is this article about?
This article is a how-to about changing a website’s current Hugo theme to the preferred one in eight simple steps and re-creating the website’s root directory.
My earlier theme was the Coder Theme, and my current theme is the Archie Theme. I’ve spotlighted the Archie Theme in the below steps.
I recommend reading this entire article before going through and completing the steps.
Decide on a Hugo theme
Deciding on a Hugo theme is easy if you know what you want. There are so many fantastic themes to choose from! 🥳
Choose a theme that suits your personality, writing needs, and website content.
But choose the most uncomplicated theme design that focuses on your content and where you can focus on creating quality content.
Content is where I expect much of the real money will be made on the Internet, just as it was in broadcasting.
― Bill Gates
I chose the Archie theme because its design is minimal, its user interface is simple, and it’s easy to configure.
The Archie Theme’s standout qualities are:
- The clean interface is Markdownish. I genuinely like writing my content with Markdown. The Archie Theme got me at Markdownish. 😂
- I can toggle my website’s dark/light modes. Dark pages are easy on my eyes. 🤩
- And importantly, this Archie Theme is responsive.
I looked at my website that uses the Archie Theme on my iPhone; it’s readable, and I can easily navigate through my site. I like that my website looks like a compact version of my desktop view on my iPad. 👍🏼🙏🏼
Go to Hugo Themes
-
On Hugo Themes, pick the theme you like best.
-
Scroll down to your chosen theme’s web page to learn more about it.
- View the demo,
- Read the features, installation, configurations, and developer’s tips,
- And consider supporting the developer.
-
Before you commit to installing your chosen theme, I recommend you go to its documentation site and GitHub repository for more details.
Decide how you want to install your selected theme
I recommend downloading the theme’s ZIP folder because this install method is more manageable and involves less stress and headache while installing and post-installing.
First, there is no right or wrong method to install a Hugo theme.
The usual install methods in no order are:
- Using the git clone command
- Using the git submodule command
- Hugo Modules
- Downloading the ZIP folder and extracting it
I’ve never used the first three install methods. However, my findings from my research of the other three methods helped me decide they were complicated.
Below are short descriptions of the main effects of using each install method.
Theme install methods
Using the git clone command
If you git clone the selected theme’s repository, you’ll get the theme’s linked full Git repository copy, which is all the versions of its files and folders on your local directory.
When you change your website’s theme, your changes synchronize with the theme’s central repository.
You can’t independently change your website’s theme. You’ll require complete control of your website’s theme to change it.
Using the git submodule command
If you git submodule the selected theme, you’ll fork the theme’s repository to your GitHub account, then from the forked repository, you add the forked theme to your Hugo website via git submodule.
A submodule refers to a separate repository that’s embedded within another repository.
Fork means you get a new copy of the theme’s repository. Your new copy is independent of the theme’s central repository you forked from.
The forked copy of your website’s theme doesn’t touch the theme’s central repository. However, you must push your website’s updated local files to your forked theme’s submodule.
Hugo Modules
If you use Hugo Modules to install the selected theme, you must learn Go to understand how to use Hugo Modules.
If you know Go, good for you! 🙌🏼 Also, you would have to install the latest Go version on your computer.
Downloading the ZIP folder and extracting it
If you Download ZIP the selected theme, you’ll get the theme’s compressed current version source files that you can extract to your computer’s target (specific) folder.
So, now that you know about the usual install methods and their effects, you decide how to install your selected Hugo theme.
But I recommend the Download ZIP method. I based this recommendation on looking at my ways of running my Hugo website where:
- I don’t need to contribute to the theme’s central repository,
- I want complete control of my website,
- I prefer the simplicity of pushing my local files straight to my website’s single central repository, and
- Not having to learn Go and have a software version of Go on my computer.
So, the easiest method of theme installation is to download the theme’s ZIP folder and extract the ZIP folder to a target (specific) folder on my computer.
Download the theme
-
On the selected theme’s web page, click the Download button.
-
You’re in the theme’s GitHub repository.
You’ll see something like the image depicted below.
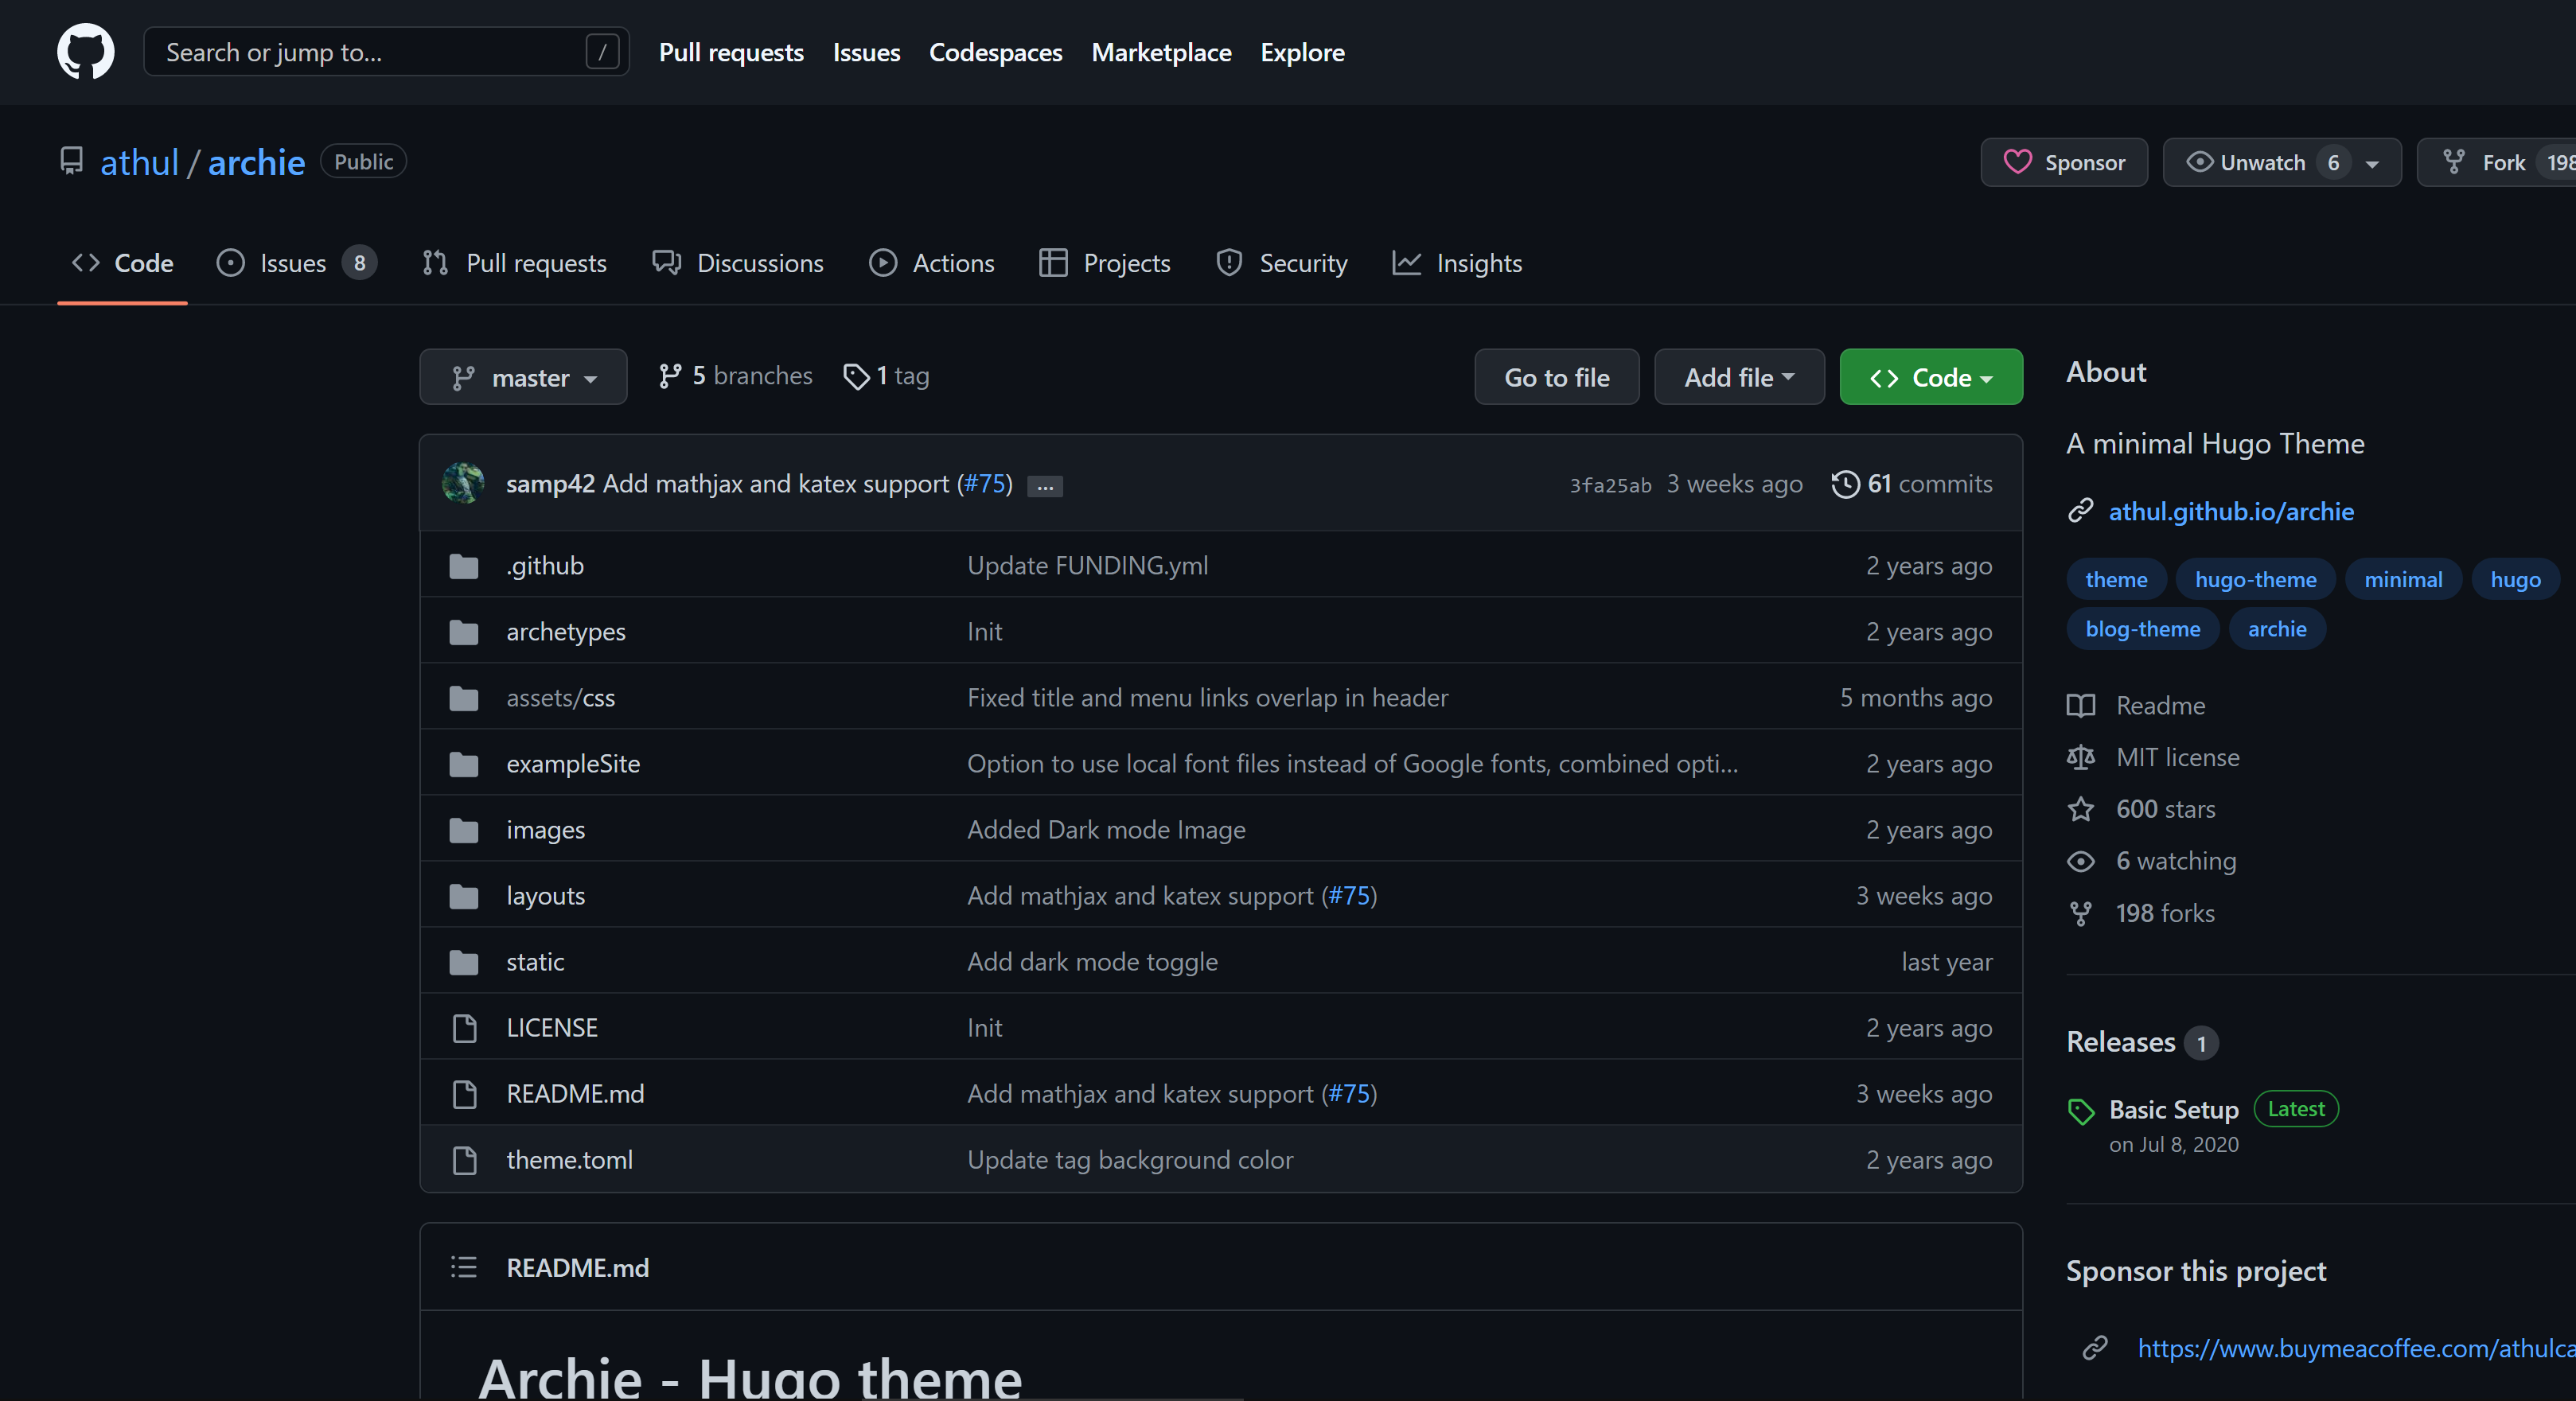
I recommend reading the contents in the theme’s README.md box because this has demo, features, installation, credits, configuration options, and a configuration of the demo site. The theme’s README.md contents are what you see on the theme’s web page.
-
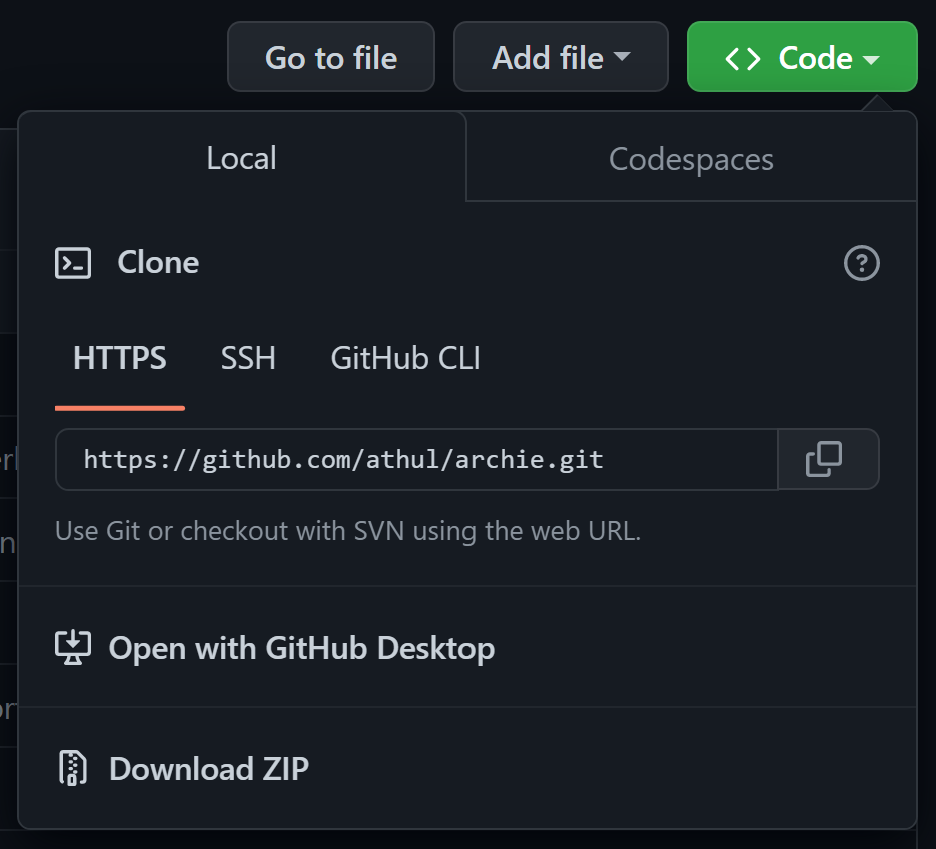
Click on the Code button.
You’ll see something like the image depicted below.
-
Click the Download ZIP button. Your computer opens the Windows Save As window, and you save the theme’s ZIP folder in your Downloads folder.
Extract the ZIP folder
-
Extract the ZIP folder to the Downloads folder.
Extracting the ZIP folder to the downloads folder first, not in a target (specific) folder in your website’s root folder, might save you from unnecessary stress and headache. My reasoning follows.
Extracting the theme’s ZIP folder to a downloads folder makes configuring your new theme easier.
While the theme’s extracted contents are in the downloads folder, you can easily find specific folders or files that you might rename, move, or remove without affecting your website root folder that’s already configured.
I extracted the ZIP folder into my Downloads folder because I didn’t want the newly extracted files to go directly into my themes folder configured to the Coder Theme.
Now that you know my reasoning for extracting the ZIP folder to the downloads folder first, let’s continue.
-
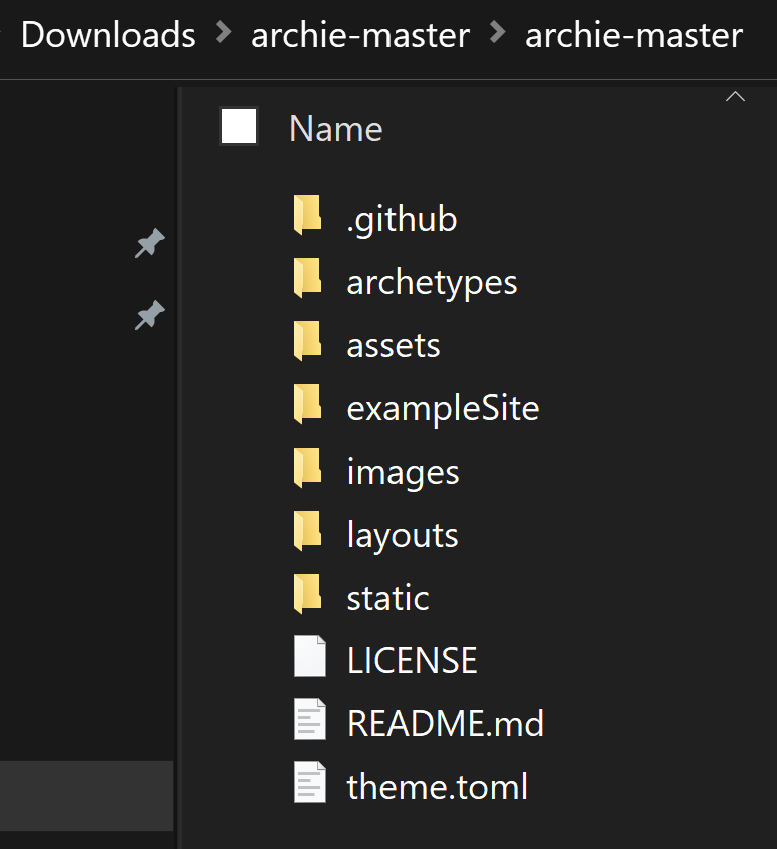
In your Downloads folder (or whichever folder you decided to extract the ZIP folder), you’ll see the extracted folder named archie-master.
-
Click this folder to see the second folder named archie-master.
You’re in the correct folder, the second one, because when you click it, you’ll see something like the contents in the image below.
-
Rename the second archie-master folder to archie. This rename is important because the folder name must match the theme name in your config.toml file.
-
Copy the archie folder to your website’s themes folder, which you’ll create in the next step.
Completely re-create your website’s root folder
I completely re-created my website’s root folder because I didn’t want the extra work and stress of merging and configuring two different themes.
The Coder Theme has more configuration settings than the Archie Theme in the config.toml file. Also, the Coder Theme uses SCSS syntax, and the Archie Theme doesn’t.
So, ignore this step if you’re an expert at merging two different themes. 🤓
If you want to avoid the extra work and stress that follows merging and configuring two different themes, follow the below steps.
-
Copy the earlier-themed website’s root folder to the Downloads folder. So, I copied my website’s root folder with the Coder Theme to my downloads folder.
This step is helpful if you need to use some files after changing to your new theme.
And if you decide to revert to your earlier theme, you still have a copy of your root folder.
-
Rename the copied root folder to websitesNamePrev
websitesNamePrev is not the actual folder name but a file name template for the copied root folder in my Downloads directory, for example, janesWebsitePrev.
-
Remove (delete) your website root folder from the C:Hugo\Sites folder (assuming you have a similar path to your Hugo sites folder).
-
Open the Command Prompt (Admin) window and change the directory to your Sites folder.
C:\WINDOWS\system32>cd C:\Hugo\Sites -
Then, re-create your website’s root folder.
C:\Hugo\Sites>hugo new site websitesnamewebsitesname is not the actual folder name but a file name template for any website’s name.
-
Change the directory to your website’s directory with the cd command.
C:\Hugo\Sites> cd websitesname -
Confirm your website’s directory by typing dir at the command prompt:
C:\Hugo\Sites\websitesname>dirYou’ll see a CLI version of your website’s root folder.
-
Create a folder named themes in your website’s root directory.
-
Copy the archie folder to your website’s themes folder.
Configure your new theme
-
In the archie folder, there’s an exampleSite folder.
-
Open the exampleSite folder.
-
Copy all its contents to your website’s root folder.
A Replace or Skip Files window might pop up. If it does, click on Replace the files in the destination.
-
Add the new theme’s name to the config.toml file that’s in your website’s root folder.
theme= "archie"
Test your new theme
-
In the Command Prompt (Admin) window, cd to your website’s root directory.
C:\WINDOWS\system32>cd C:\Hugo\Sites\websitesname -
Then, run the hugo server:
C:\Hugo\Sites\websitesname>hugo server -
The hugo server displays your local site’s URL:
Web Server is available at http://localhost:1313/ -
View your local site sporting the new theme.
Important tip if you run into a hugo server error.
When I tested my new Archie Theme, I ran into a hugo server error that prevented Hugo from continuing its building of my site.
I don’t recall the specific hugo server error. But the error was related to the data below the Tweets heading in the post-6.md file in the exampleSite folder.
I immediately found a solution by copying the error message and number from the Command Prompt (Admin) window and pasting the error message and number on Google’s search bar.
I removed the Tweets heading and the data below it in the post-6.md file. I didn’t delete the entire file because I wanted to see how the file looked on my local site.
I reran the hugo server, and the error was gone. Hugo was able to complete building my website.
If you haven’t run into a hugo server error viewing your local site sporting the new theme, you’re good to go.
Conclusion
Now that you know how to change your website’s current Hugo theme to the one you like, get a comforting favorite hot cup of whatever, and watch a movie. ☕🍵🥳
Helpful Links
Thank you for reading!
Please share this how-to article with your family, friends, and anyone who might need to change their website’s current Hugo theme to the theme they like.
Follow me on Instagram 😁